16854 - 20h

🍊 orange update 🍊 
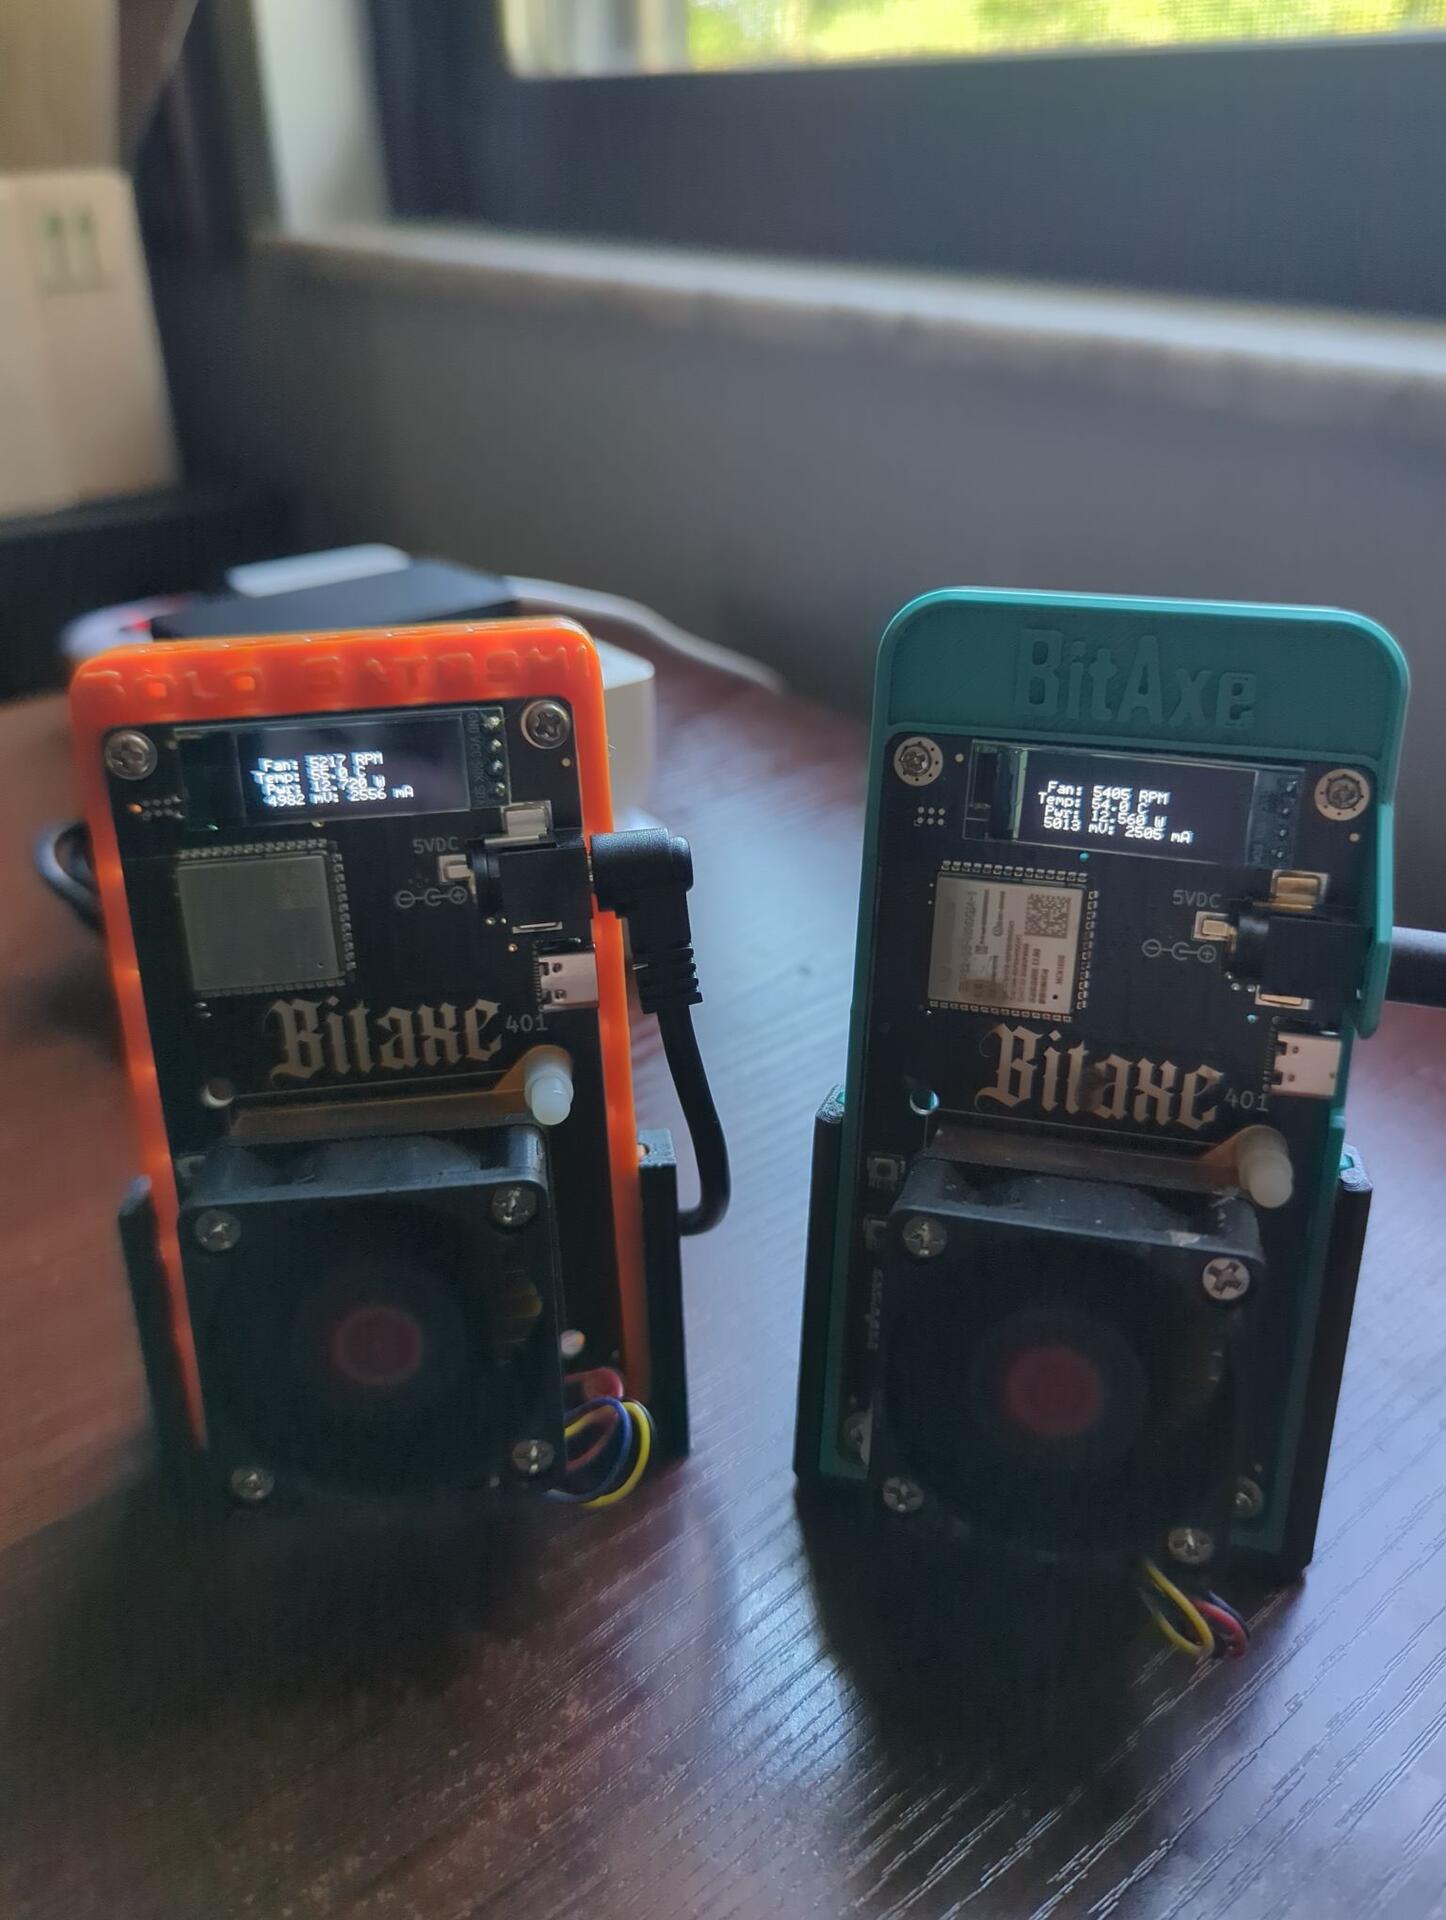
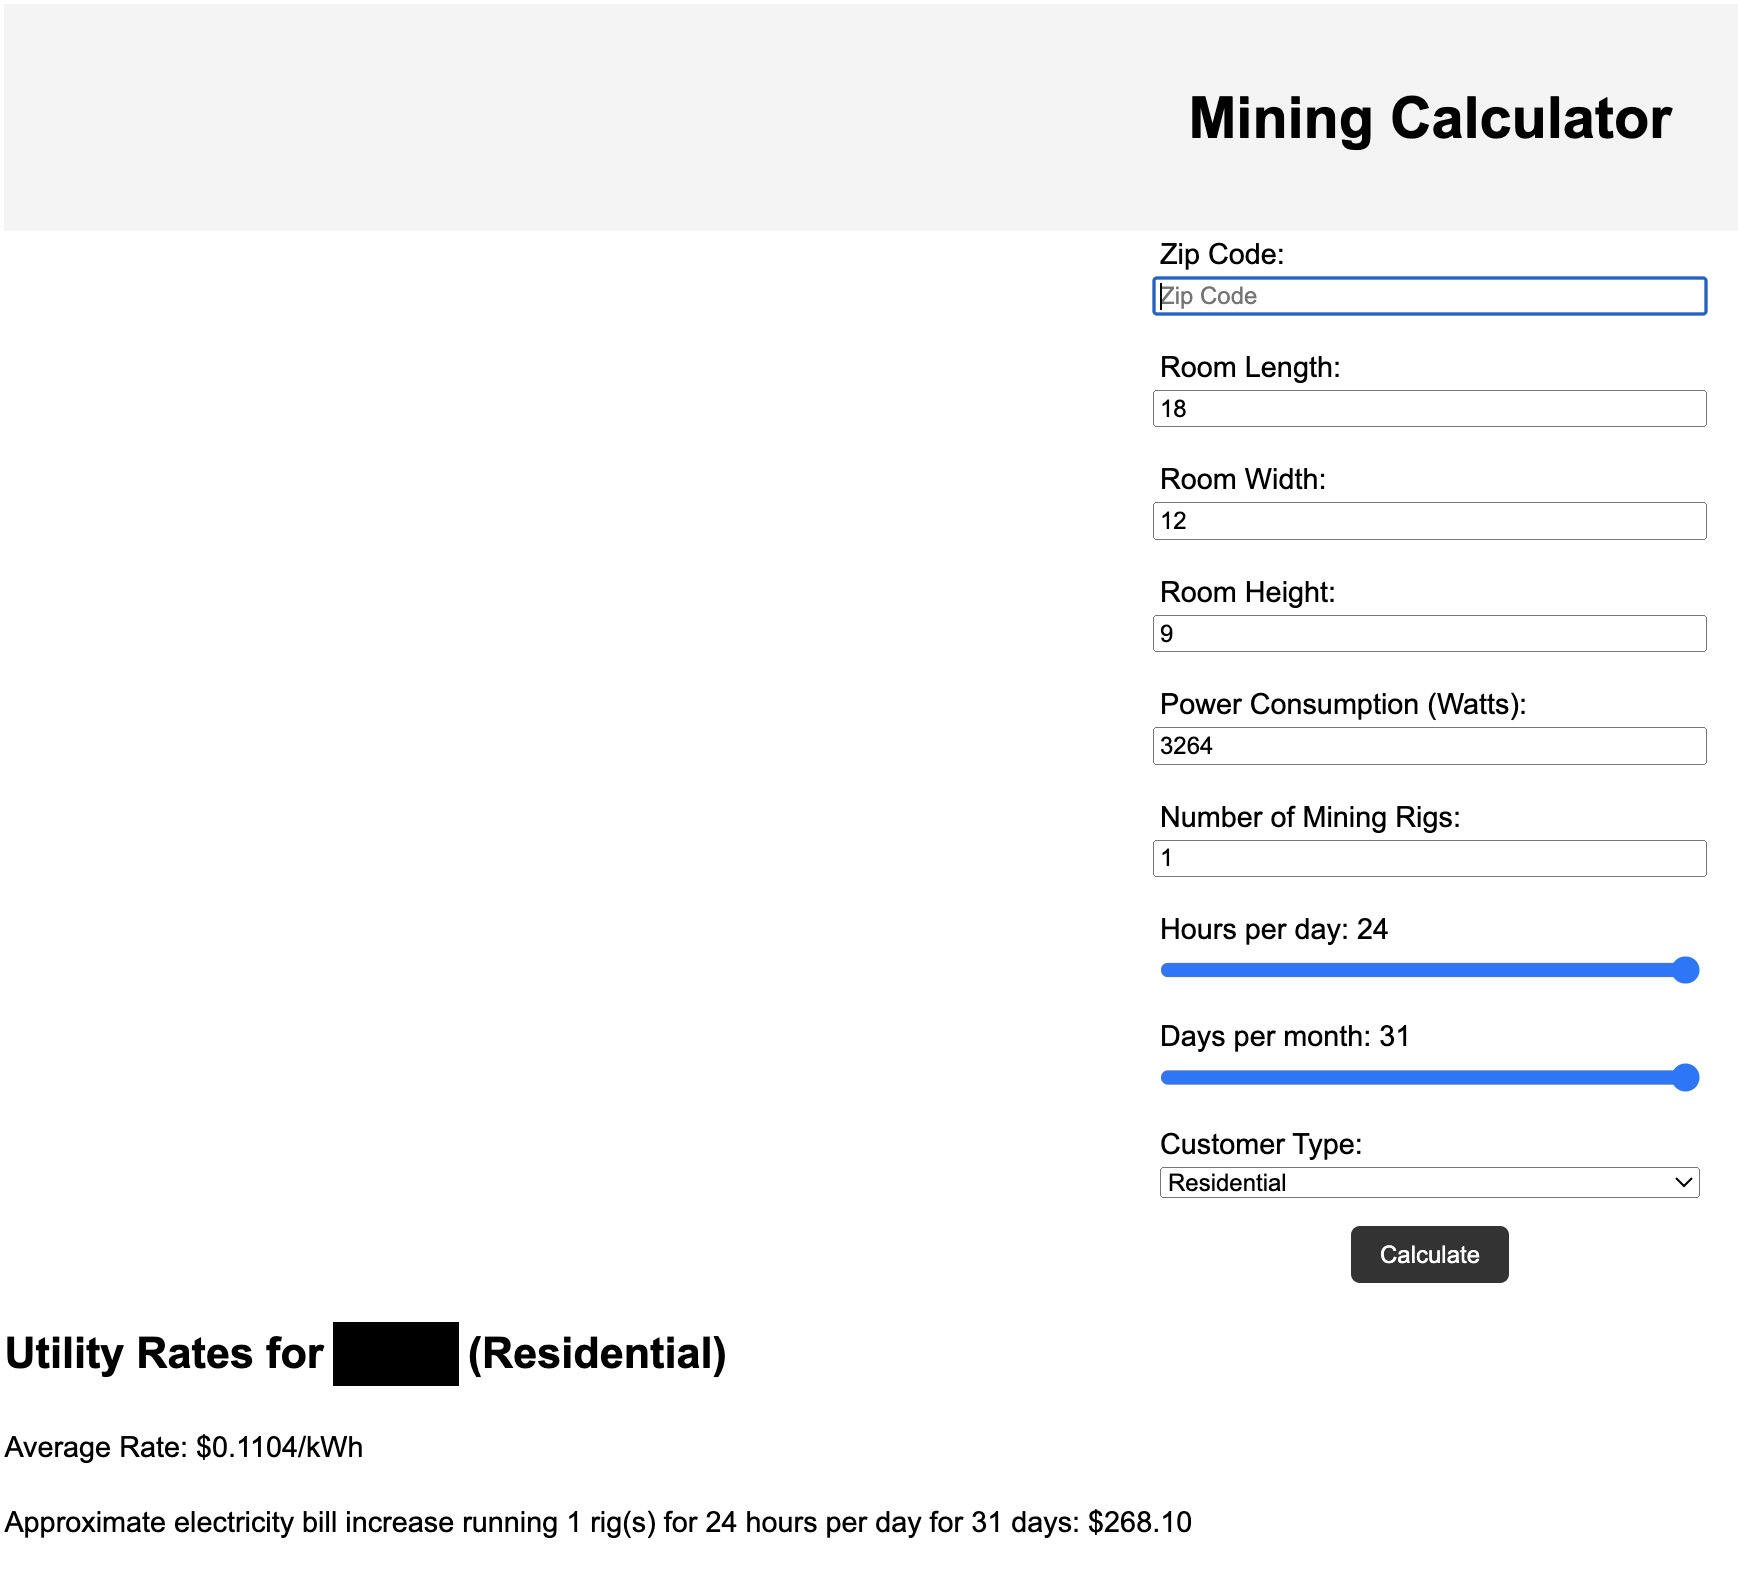
Update on the air quality testing with the miner running in the sound proofed unit. I used an electronic Air Quality testing device to do this. In summary, after an hour of running the miner, it actually improved the air quality by a small margin. This is good, no nasty stuff coming out when the miner is running. Also, it increased the room temperature from 21.6 to 24.9 degrees Celsius after 1 hour of running (standard size living room with furniture). Things done to control the testing environment. 1) Closed windows and doors so there is none or very little airflow coming into the testing room. 2) Let the testing device run for an hour in the room to get an accurate starting reading. 3) Placed the testing device around 1.5 meters away from the warm air vent. Above the unit and to the side of it where it would get some of warmer airflow. 4) No movement of anything in the room. After 1 hour of letting the testing device settle in the room, I took 3 readings 2 minutes apart to get an accurate starting reading. (This is before the miner is switched on) PM2.5 = 4.4, 4.1, 4.2 (Average = 4.233) PM10 = 7.8, 6.8, 6.0 (Average = 6.867) HCHO = 0.02, 0.02, 0.01 (Average = 0.0167) TVOC = 0.02, 0.02, 0.02 (Average = 0.0200) Temperature Degrees Celsius = 21.6, 21.6, 21.6 (Average = 21.60) After switching the miner on, I took 3 readings every 20 minutes (20min, 40mins and then at 60mins). PM2.5 = 3.4, 3.1, 3.2 (Average = 3.233) PM10 = 5.8, 5.2, 5.6 (Average = 5.533) HCHO = 0.01, 0.02, 0.01 (Average = 0.0133) TVOC = 0.01, 0.02, 0.02 (Average = 0.0167) Temperature Degrees Celsius = 22.9, 24.1, 24.9 (Average = 23.97) I will do some more extended testing when the weather gets cooler. #DIY #Bitcoin #Mining #BTC #Airquality

0
1
3

16854 - 21h

🍊 orange update 🍊 https://image.nostr.build/fef7679752ae29020bf8c2e85d2047189758ccb58a8ab153aafd35f2c9911fc7.png https://image.nostr.build/f485bfe9e461eb8494942a945e83d59e4f79f2bbd86f22ba236252e3be4f059f.png Just doing some testing here with epoxy on some scrap wood. 1) Thought some black glass would look interesting so I sprinkled that into the gap in the wood. 2) I mixed some epoxy resin and added a small amount of orange and black dye to give the resin a slight tint. 3) Poured the resin slowly into the gap. Used a heat gun to remove any air bubbles from the resin. There were quite a lot of bubbles because I mixed the resin too fast. 4) Covered it to stop dust falling on top while leaving enough room for airflow. I fvcked up because I came back to check in on it after an hour and the resin started leaking out of the sides. 🤦‍♂️ Had some mess to clean up and put the spilled epoxy back into the gap and clamped down the plastic bits so there definitely will not be any more leakage. ✅ Before doing any of this you need the temperature to be around 22-23 degree Celsius otherwise the resin won't cure properly. So I got some electronics to keep the work room at a steady temperature while the resin cures. Also, it's very humid today so I'm also using a dehumidifier to decrease the humidity in the work room to help the curing process. Will check back on it after a few days after it's fully cured. #DIY #Bitcoin #Mining #BTC #Wood #Woodworking #Hardwood #Paint #Art #Artwork #Epoxy #Design

0
0
3

0
0
3

16854 - 4d

0
0
3

16854 - 6d

🍊 orange update 🍊 https://image.nostr.build/a05ebef115778bba3fd07d05a82db2e6f0abba4bbb884a053caa4b4e6fc73953.png https://image.nostr.build/c43a8d9e00cd0798bea3e94b1df33028cfa1155c47a7b9bf87edad6b50fb7731.png https://image.nostr.build/9f6e338d23fd6c4ce2874ab29b9d07f280724720e65ac5e262c84caf4f8ee30c.png https://image.nostr.build/ee01ba61b865de54bc7c5b33d7e4b806a29d40489b8ab20014035dd34bbf85dc.png https://image.nostr.build/909d274d1c00b83c299b7ebc3d47994185629b5817365217921c64772b60464a.png https://image.nostr.build/5303b07aac54dc3c54fc0d4f27e86c8a333336c1b0b813ccbcd5238d3568971b.png https://image.nostr.build/d82ff70bc925822d8e95ed94920a62d04e394234708ef686de94bf5f850264eb.png Following on from the last post, I am tidying up this scrap piece of wood for some paint/epoxy design testing. 1) Glued some low grit sand paper to a file (file was awful) and used that to sand down the middle bit. Also just used sand paper without the file. Made the middle section reasonably smooth/level. 2) Cut some pieces of plastic and sanded down any sharp edges. Taped to the end of the wood gaps. When I pour in the epoxy resin, the plastic pieces will prevent it from spilling out. 3) Taped off areas prior to applying paint in the middle. 4) Did two coats of white paint in the middle bit (acrylic paint, can't use oil based paint because the epoxy gurus say not to). Did one coat of black on the middle bit sides. 5) Orange was too bright so I tried to dull it down to a pumpkin orange by mixing in some black. Fvked that up and it looked like squashed bird shit. 🤣 6) Take 2 on the orange mixing... and it looks much better. 7) Did one coat in the middle and then used a fine paint brush to blend in the edges a bit. Still need to remove some of the white paint from the top. Next I'll do the epoxy.. thinking of going for clear epoxy with a slightly black tint. All of this is just testing, trying to get a feel for what can be done and what can go wrong. #DIY #Bitcoin #Mining #BTC #Wood #Woodworking #Hardwood #Paint #Art #Artwork #Epoxy #Design

0
0
3

16854 - 7d

🍊 orange update 🍊 https://image.nostr.build/2cf490cffd246b8e4ed4e51eb6776c94c7a0df0de2dd5ec2e399e73cb7c15cf6.png https://image.nostr.build/b8683e9bb36db79dd75b6ebc0b366e182c0468cc4544a9662a8809df4ca1400c.png https://image.nostr.build/6132d5c5ac75b35d2e3b512e75d90be92e709671808eba63272f0ef84f3aa9d4.png https://image.nostr.build/2f35280fc8d7da36eb0cab50beeaa6773411a0c23d47d03f05789875b573684f.png Next I'm using some scrap wood and carving out some gaps to test out some artwork on the inside (paint & epoxy). Running tests on this scrap piece of wood so I get enough experience to do the table top to a good standard. (Have not done this before) 1) Marked off the wood in the middle vertically and horizontally. Remarked it from the middle but with a 1cm gap. 2) Clamped wood down and put a cloth under the clamps to avoid damaging the wood. Used a small fine tooth saw to cut a few mm deep (acts as a guide rail for the next part). Next I used a bigger saw (longer and bigger teeth) and went full force to cut through the wood. Only want to go halfway deep here. (used a hand saw) 3) Saw someone on YouTube use saw dust to fill in small cracks in the wood. Could be useful later if I need to do that, so I put some clean saw dust in a bag. 4) Luckily found a chisel the right size to remove the middle bit of wood. I guess most chisels come around 1cm wide. Used a hammer and chisel to slowly knock the middle bit of wood out. Yup, I smacked my hand with the hammer a few times by accident. 😅 Still need to sand down the middle bit, clean it, test out the paint and epoxy. Then cut the other way across using the method above and do more paint and epoxy testing. Lots of testing to do! Curious to see what this scrap piece of wood will look like after I am done with it. #DIY #Bitcoin #Mining #BTC #Wood #Woodworking #Hardwood

0
0
3

16854 - 7d

0
0
3

16854 - 8d

🍊 orange update 🍊 After many hours of learning about wood finishes I found a product and technique that seems to work and one that is relatively safe and idiot proof. https://image.nostr.build/e138b4cdb112d73a8e75ca126794875a65817727bee2e8706b35de9369c903ae.png 
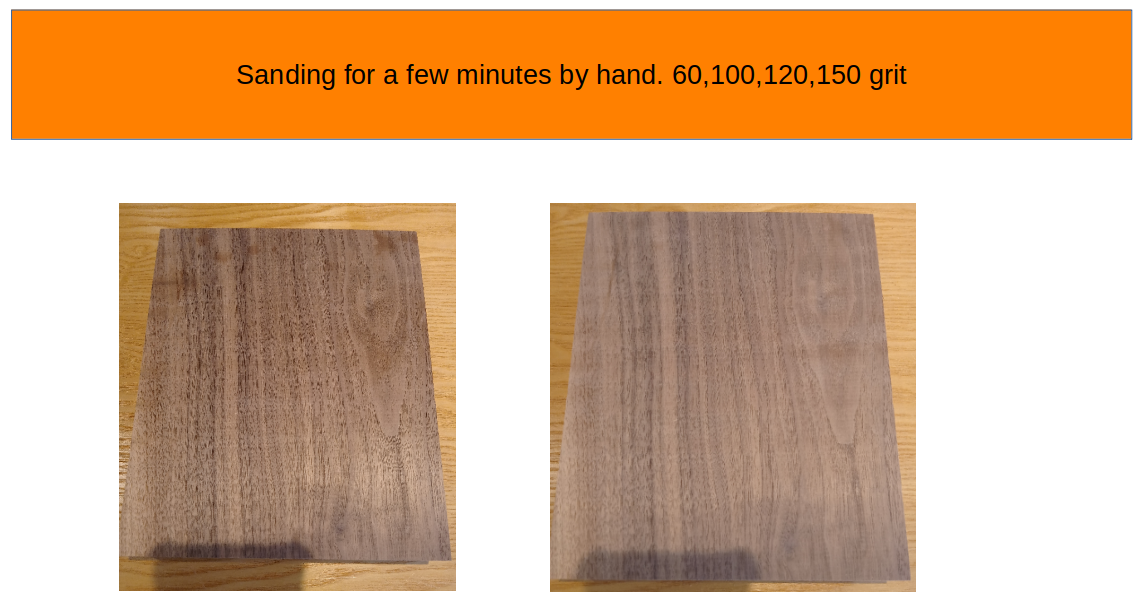
I used some sand paper and gently sanded down this block of wood in one direction (along the wood grain). I did a couple minutes with different sand paper grit levels 60,100,120,150. Between each level I vacuumed it, wiped it with a cloth and used some pressurised gas to remove any dust. When I get round to doing the table top I will also use 80 grit sand paper since I did not have it available right now. https://image.nostr.build/0769173ca0513005bf3c220d5b079af7d39a4b97ee2d511e4824fd9d6e5d71ff.png 
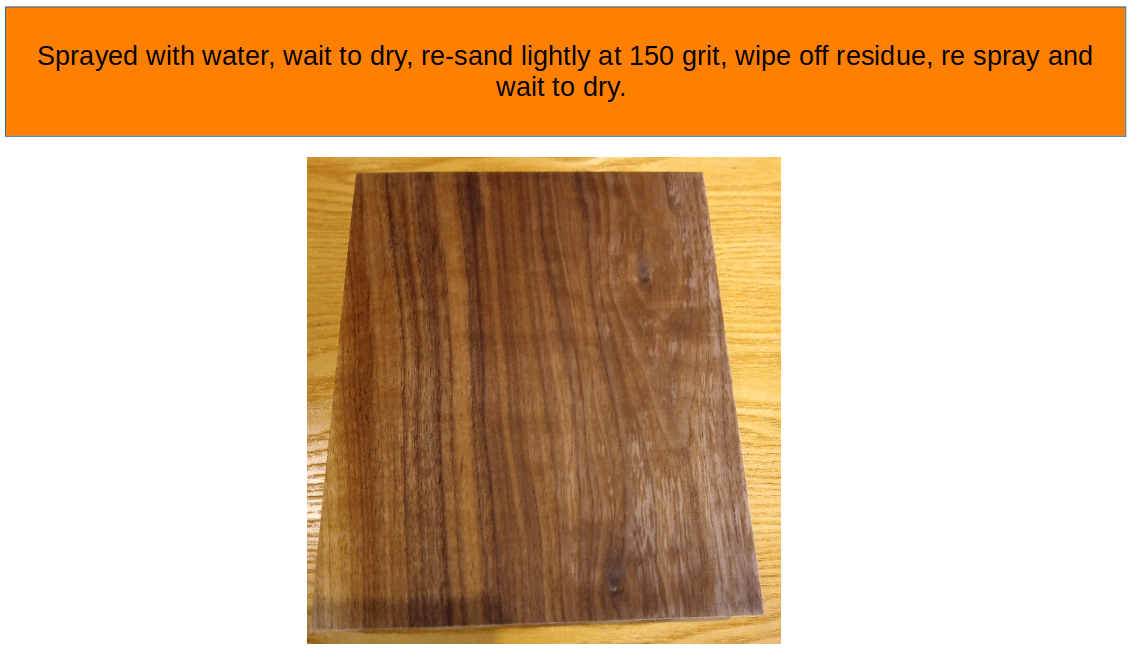
After removing all the dust with a cloth, vacuum and pressurised gas, I then evenly sprayed the wood with water and wiped it down. I let the wood dry then sanded it very gently by hand with 150 grit sand paper. Followed the same procedure as before to remove any dust. Sprayed with water again, let the wood dry. I did it twice because it felt a little off after the first round. https://image.nostr.build/caa7973edc29d38a512a8a15df8ff9cb6e543f2e578f1b478d4f66cd58386b47.png 
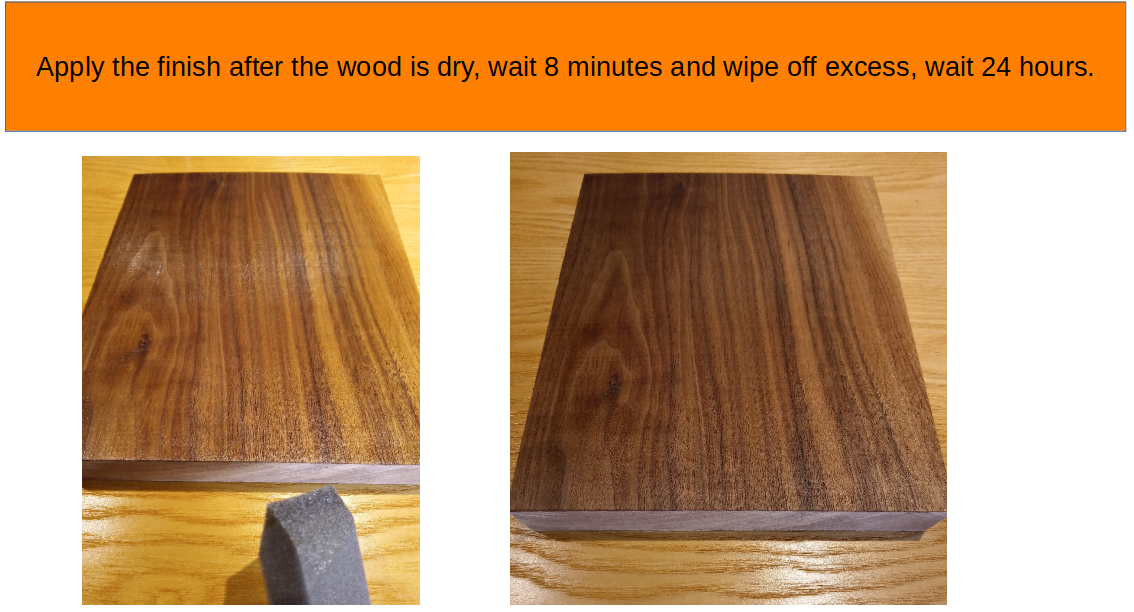
Soon after the water dried, I applied an almost clear finish to the wood (Rubio Monocoat) with a foam brush, let that settle in for around 8 minutes, then wiped off any excess liquid with a soft pad. I then waited 24hrs for the next part. https://image.nostr.build/107212f77ef59ab097f333682631de87595ba42a035903dc04ce34a57d199b18.png 
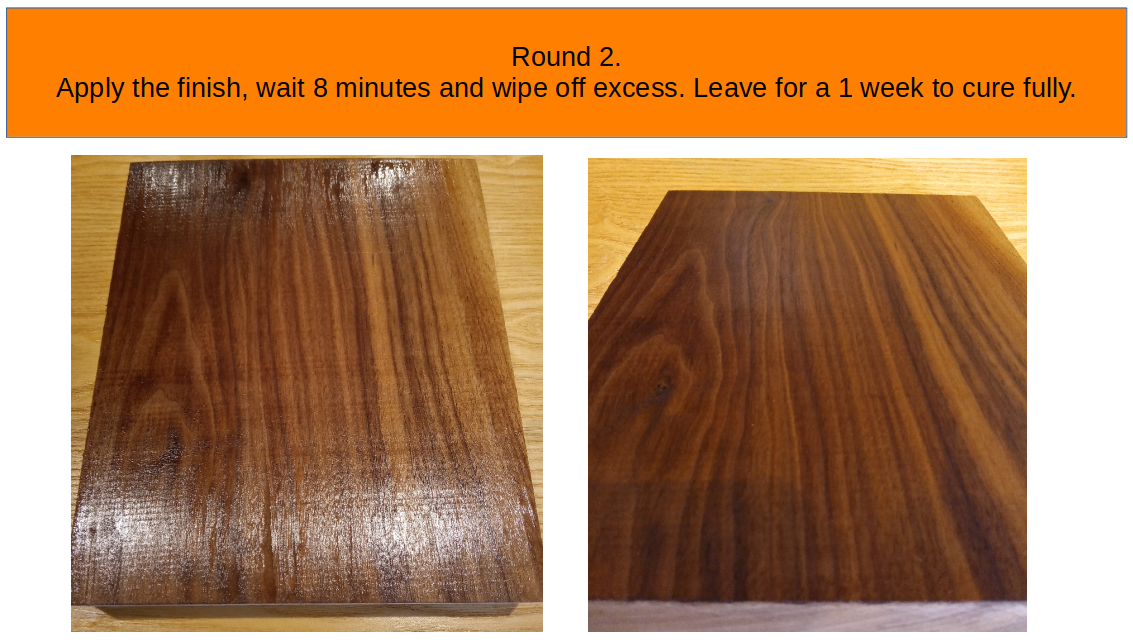
After waiting, I used 320 grit sandpaper and gently sanded down the wood, used a vacuum, cloth and pressurised gas to remove any dust. Then I applied the second coat of the finish, waited 8 minutes and wiped off the excess. It should take around 1 week to fully cure, at that point I will do some durability testing on it. Some notable YouTube channels that helped with this finish method was "Lincoln St. Woodworks" and "Bent's Woodworking". #DIY #Bitcoin #Mining #BTC #Wood #Woodworking #Hardwood #Finish

0
0
3

0
0
3

0
0
3

0
0
3

0
0
3

0
0
3

0
1
3

0
0
3

0
0
3

0
0
3

0
1
3

2
0
3

0
0
3

Showing page 1 of 15 pages